Thursday, March 28, 2013

SFF 3-29-13

Hello to all my blogging friends, I hope this post finds you all well and happy!


This week it was my turn to create the sketch for Sketch Frenzy Friday. This is what I came up with.


Now here is a look at my card.


Weeks ago when I created the sketch I had a totally different idea as to what I would create with it. But, when it came to actually sit down and make the card I just didn't like what was going on on my desk lolol (A MESS!) I accidentally flipped over a piece of DSP and fell in love with the pattern. So just by chance the DSP gave me the inspiration for this card. It is very unusual for me to only use two colors on a card and I really like how it turned out.
I think the all the elements gave the card depth, texture and a touch of elegance. What do you think?

Here is a list of Stampin' Up supplies I used to make this card.

Card Stock- Island Indigo and Whisper White
DSP- Sycamore Street- SAB
Stamp Set- Wacky Wishes
Die's and Punches- Apothecary Accents,Extra Large Oval, Large Oval, Lables Collection, Ovals Collection and the Lacy Brocade Embossing Folder.
Embellishment- Basic Pearls

I hope you have a great week and you to find some time to create something fun. If you create a card using this sketch we would love to see it. Please download it on to our home page here
http://www.sketchfrenzyfriday.blogspot.com/

Chat soon,
Patrice

Wednesday, March 27, 2013

Winter Wonderland

Hello to all my blogging friends, I hope this post finds you all well and happy!

Well, I think/hope we had our last snow storm for the winter Monday morning. Look what we woke up to. Looked like about 4 inches. About as much as the storm in late December. Snow makes the landscape take on a whole life of its own.

This is the front of the property.


This is what the back yard looked like


You still have to make sure the birds have access to the bird seed and water.

I especially love the way the snow looks on the trees (Natural Flocking)


We finally got enough snow to have some fun!

So what do two grown women do in the snow...
We Played


We had so much fun. But, by the time we were done my neighbor Lisa's feet were frozen solid. Being from Southern. California I had never built a snow man before it is quite a learning experience. You actually just roll a little ball in the snow and it grows? I really never got the concept of a rolling snow ball in commercials until now. The sad thing is that the snow around here only last a day on the ground, so it was good that we got out and made Mr Snow Man and Ms. Easter Bunny before it all melted.


Hope you are all safe and warm and have a great Easter Weekend!
PS. You can see Bob Cat peeking through the window on the right hehe!

Chat soon,
Patrice


Thursday, March 21, 2013

Sketch Frenzy Friday 3/22/13

Hello to all my blogging friends, I hope this post finds you all well and happy!

This weeks wonderful sketch was designed by my friend Maria Vanderform and boy oh boy is it a great one.


This sketch has so much potential. I just love it! Lets see now what to do???

Finally done,


Well what do you think? I added lot's of layers, a few strips of  pretty DSP (Print Poetry) from the Mini Catalog, a couple dimensional flowers, a nice piece of shiny blue SAB ribbon, and then a nice embossed edge for some background texture.  After I took this photo I noticed it did't have the Dazzling Diamonds on the little yellow flowers that I added afterward. It was a nice extra touch to give the flowers a little bit of bling.

I did a bit of masking on the inside.
I have to giggle a bit, because it took me forever to learn how to "Mask". I must have asked Carey how she did that a million times before I got the hang of it! Now, at least most of the time when I make a mask I keep it in the stamp's container to use another time.

Supplies used to make this card.
Card Stock- Gable Green, Island Indigo, Naturals Ivory.
DSP - Print Poetry.
Stamp Sets- Blooming Marvelous, Secret Garden Blessings from Heaven.
Ink- Gumball Green, Summer Starfruit, Midnight Muse.
Embellishments-  Sycamore Street Island Indigo Ribbon, Dazzling Diamonds, Little Leaves Sizzlits, Framed Tulips Embossing Folder and the Corner Rounder Punch.

That's it for this week. I hope you got inspiration by Maria's sketch, I sure did! We would love to see what you come up with this week! So please go to our home page and download your creation so we can see what you come up with.  Hear is our link http://www.sketchfrenzyfriday.blogspot.com/

PS. We had 13 submissions last week! Holy smokes that's fantastic! Thank you everyone who submitted a card. They were all beautiful and very creative! Again, thanks so much for playing along, it really does mean the world to us!

Have a great week my friends and Create something fun!

Chat soon,
Patrice

Thursday, March 14, 2013

Sketch Frenzy Friday 3/15/13

Hello to all my blogging friends, I hope this post finds you well and happy!

This weeks sketch was designed by Jennifer W and it is right on time! I am so done with winter and I am really ready for spring. Jennifer's sketch just screams SPRING! See what I mean.


Here is a look at what I came up with.


A little something bright and cheery for you! I haven't made an easel card in a long time so I decided to make one for this sketch. I wanted a little more length to my card and this type of card fold does the trick. The next photo shows the easel fold.


This view shows how fluffy the flower is also. I believe I saw Beate Johns make one over at SCS. They are fun and easy to make.

Now for a look at the inside.

I stamped the focal image twice once on a scrap paper then did a little huffing to re-hydrate the ink and re-stamped the image again on to my Whisper White card stock. This technique makes a lighter image especially if you want to write over it as I do for this card.

Here is a list of all the Stampin' Up supplies I used.

Ink- Pool Party and Midnight Muse
Card Stock- Calypso Coral and Whisper White
Stamp Sets- My Friend and Mixed Bunch
Embellishments- Pool Party Bakers Twine, Basic Pearls the Ribbon, Button and DSP were all free from the SAB Catalog. This set is called Sycamore Street
Framelits- Bitty Banners
Embossing Folder- Lacy Brocade
Punches-  Blossom, 7/8 Scallop Circle and the Bitty Butterfly

Well that's all there is to this card. I do hope you too find some time to create something fun this weekend.

Don't forget to pop on over to the SFF home page http://www.sketchfrenzyfriday.blogspot.com/ and see what the other designers have come up with. We would love to see your creation so just down load it on to our blog while you are there.

Chat soon,
Patrice

Tuesday, March 12, 2013

A walk on the C & O Canal + Twist Fun Fold Card

Hello to all my blogging friends, I hope this post finds you all well and happy!

Well ,so much for a restful weekend indoors! It was so beautiful outside and upwards into the 60's! Who in their right mind wants to stay indoors when the weather was so nice. Not us. It called for a road trip!

We found the coolest place to take a walk. The C & O Canals in Williamsport, Maryland  (C & O = Chesapeake and Ohio). We are finding the President Washington had a great impact on West Virginia. Washington aided in having this canal project built. It is 187 miles long and it took 7 days for barges to travel it's length.  The barges were pulled up and down the canals by mule walking on the tow paths. The tow paths are now running, biking and walking trails. We were walking near the Potomac River.

We sat and listened to several short videos at the visitors station that detailed the whole project, it was very interesting.
Then we took a long drive to Little Orleans, Maryland to see another part of the canal project near the  Cacapon River. We walked round and chatted with people it was a really nice day.

Here are a few links that explains what the canals are all about.
https://www.google.com/search?q=C+%26+O+Canal+Project&hl=en&client=qsb-win&rlz=1R3GGLL_enUS337US343&tbm=isch&tbo=u&source=univ&sa=X&ei=w8I_Ud2SCYXq0QHkyYDoDg&ved=0CEwQsAQ

https://www.google.com/url?sa=t&rct=j&q=&esrc=s&source=web&cd=10&cad=rja&ved=0CGkQFjAJ&url=http%3A%2F%2Fbikecando.com%2F&ei=xMc_Ube2IaXT0wHX9IHQDw&usg=AFQjCNFcBdPrvx3mYZECOu7U0NXYjrmKdg

Today I finally got some me time so I made a couple cards. The project I am going to show you today was designed by  Dawn O. I have given you a link to her tutorial on how to make this card. http://dostamping.typepad.com/dostamping_with_dawn/2013/03/video-twist-fold-fun-card.htmlTwist Fun Fold card.

Here is my card
and now for the inside where you can see the fun fold. There is a pocket right side that will hold a gift card. Cleaver huh!


and a side view
I just learned how to make this cute flower. I think I saw Beate make it on SCS.

That's it for today an adventure story and a card! lolol

I hope you find some time to create something fun too!
Chat soon,
Patrice

Saturday, March 9, 2013

Field Flowers

Hello to all my blogging friends, I hope this post finds you all well and happy!

My dear sweet BFF (Hi Carey xoxo) gave me this set for Christmas and I finally whipped up a card using the flower stamp. I have always wanted this set because of all the possible dimensions you can make with it. One of the options I think is called "Two Step Stamping" . This is when the stamp set has one stamp that is an image and the second stamp is a heaver outline stamp? Also, there is a smaller center image that has  two little stamps that you can do the same thing to. I used the little set to pop up and add even more dimension to the card.
Maybe seeing it gives you a better idea I'll show you what I mean.
I used Pretty in Pink ink for the base flower color and then stamped directly over it using the second stamp in Primrose Petals ink. To make this effect work correctly you have to use a somewhat darker color for the outline image. I cut a Paper Doily in half and used only parts of it because, I wanted only the edges of the Doily to outline the Apothecary Jar I could control the placement a little better in doing so. It appears a bit more oval than round in person.
Oops, looks like I smashed the right edge when taking the photo! I didn't see that until now? I'll have make sure I fix that.
The stem and "with Love"sentiment were stamped in Always Artichoke. I punched three Modern Labels one stamped with the sentiment  and tucked that under the flower embellishment . I made a small paper flower out of another doily piece for the backing of my flower embellishment. The little pink rose is from the Artisan Embellishment Kit.( I just love that kit) I tied a little bow using Hemp Twine and flattened out the edges for extra interest. Hemp Twine is thicker than our Lenin Thread but SU discontinued the Hemp Twine for some reason? The entire piece was mounted on to a background piece of Primrose Petals that I ran through Mr Big Shot using the Honeycomb embossing folder.

For the small paper doily flower I used a trick Maria Van Derform showed us a few years ago. I couldn't find her tutorial in time for this post. I'll have to send her an e-mail to see if she saved that tutorial? This is going to be tough to explain??? How to make a circle into a straight line ? Here goes...
Cut around and remove the inside white circle of the doily. Only using the outside lacy part you gently snip the inside edges of the lacy piece. Snipping the edges allows the edge to become more flexible so that you can lay it out and make it flatter. I did a mountain and valley fold between the circles of the doily edges and attached the ends together. Once the ends are attached gently flattened it out just like you would do making one of our rosettes. I attached the flattened flower embellishment to a large glue dot that was attached to a little scrap piece of paper. Once it is attached to the scrap piece you are able to adhere the embellishment any where you like. there you have it????  That wasn't so bad right? ha ha!
I will still get in touch with Maria, smile!

Maria sent me the link for her tutorial (thanks Maria) http://www.youtube.com/watch?v=_B6XxQ-UdPk&feature=share&list=UUTVwAvzbREr-L55MHdGAByw

Hope you have a great weekend and find some time to create something fun. I don't think we have anything planned for our weekend yippee! So it looks like I can spend some time in my craft room with my honey. He conquers the world on his computer, while I stamp. I gave him a little corner of my space for his desk and computer lololo.  We watch  movies, chat or listen to music. I like weekends with my honey!

Chat soon,
Patrice

Thursday, March 7, 2013

Sketch Frenzy Friday 3/8/13

Hello to all my blogging friends I hope this post finds you all well and happy!

I am writing this post a bit early because of the snow storm we are supposed to have Wednesday and Thursday. I wonder how much snow we will really get?? They say to expect possible power outages and anywhere from 6-12 inches, so I'm getting my post done early just in case.

UPDATE: Good News Bad News; Bad news is that we only got 4-5 inches and most of that was in the early am. It started clearing up around 11:00 am and the snow didn't last very long. Good news is that when we woke up it was snowing really heavy , and if it was supposed to keep that up all day long it would be too dangerous for my honey to get home from work  so he stayed home with me. The best thing of all was that there were no power outages near us. Think good thoughts for those still with out power please'


This weeks sketch was designed by Deb Currier isn't it adorable! I thought it would be easy peasy to whip up a card! But No Way! There really is a lot to this sketch. What a good challenge Deb!

Here is what I came up with;
I added that cheery background DSP from the SAB freebie's. It's called Sycamore Street and I just love it! Then it took me for ever to match card stock to the DSP. Maybe it was just me but it took me a long time to make this card????
I have lot's of texture on the focal image and the banners. I got to use a bunch of embossing folders and Framelits.  Mr Big Shot got a really good workout today!
I hope you like my little card! Here is a peek at the inside too.


Su Supplies used on this card;

Stamp set- Wacky Wishes and Oh Hello.
Ink- Classic Black
DSP- Sycamore Street
Card Stock- Calypso Coral, Island Indigo, Pool Party, Whisper White, Rich Razzleberry and Summer Starfruit.
Framelits- Apothecary Accents and Labels Collection.

Well I'm going to cut this post short. Hopefully I will be able to have it up on Friday.
If you would like to try your had at this sketch we would love to see what you come up with. So download it on to our blog http://www.sketchfrenzyfriday.blogspot.com/

Have a great week, stay warm and have some fun in your craft room.
chat soon,
 Patrice

By The Tide or under the sea

Hello to all my blogging friends I hope this post finds you well and happy!

I have been busy in my craft room playing with all my new goodies. When I first saw the stamp set
By The Tide, I knew I would eventually end up with it!  However, it took me a while (I am still working with it) to decide what I wanted to make. There are so many wonderful images in this set it is really hard to decide which ones to use. But, I finally came up with a fun seascape for you.
(I have an idea to make several Lobster cards for my daughter as she works at Red Lobster. Shhhhh don't tell her it will be a surprise!)
Here is my creation.


I sponged a piece of Ivory CS in Marina Mist and Certainly Celery to make the background . Next I stamped several of the images that come in this set (fish, sea fan, and fancy script) on to my background piece as if to make the fish appear to be swimming in the background and near the sea floor.
Now for the fun part, stamp several images 2-3 of each image that you want to use and color them in. Select the best ones and cut them out as close as possible to the image line. Once they are dry sponge the edges and add some Stampin' Glitter here and there to make the fish and the shell shiny. I added a  few pearls and rhinestones for the fish eyes and to line the shell lip. Then mount the images with Stampin' Dimensional's. Play around with the shapes until you find out where you will want to place them permanently then stick them in place.
There you have it.

I hope you like my little under water seascape and find some time in your busy day to create something fun also.

I made a pretty floral card today also, but I won't show you that one until Saturday. Tomorrow is Sketch Frenzy Friday and I have a card all ready for this weeks sketch challenge, Please come back to see what our design team has in store for you.

Chat soon,
Patrice

Tuesday, March 5, 2013

Little Black Dress

Hello to all my blogging friends I hope this post finds you all well and happy!

I don't know if I will have power or not tomorrow so I thought I would post this now! We are supposed to have 8-12 inches of snow Wednesday. I am so excited to see a real snow storm. I know crazy right! Well as long as I am inside and warm (Pray that the power doesn't go off) everything will be OK!
We are as prepared as possible, long underwear here I come ha ha ha! I wonder how those would look under this little number?


How about that for a Little Black Dress? I cut down one of the die cut dresses to make this dress.
I just love the stand in the silver sparkle paper. There are so many designs I can make from this set  floating around in my head.
Do you remember the Mc Calls Magazine from say 50 years ago? In many of the issues they had paper dolls and dresses in them. My Grandmother would save the articles for my sister and I for when we would come and visit. We would spend hours playing and just having a ball designing our own dresses and gowns.
I did a little something to the inside.
I have to get going it is getting late. I hope you have some time to create something fun too!
Chat soon,
Patrice

Monday, March 4, 2013

White Embossed Cards

Hello to all my blogging friends. I hope this post finds you all well and happy!

I have gotten a lot of inspiration lately from Sandy McIver's blog. She is doing a bunch of great videos on new techniques (well new to me anyhow lolol). Sandy found this technique over at Amy Koenders blog http://stampwithamyk.com. Both ladies give great instructions on how to do this technique.

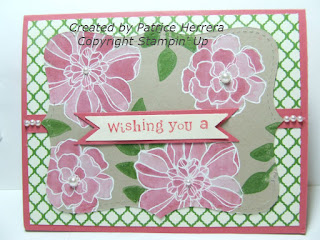
The technique is referred as White Embossed. It is a little time consuming as you have to wait (I know) for the ink to dry. But it's faster than waiting for the paint to dry ha ha ha... The result is really beautiful. I love how the white embossing makes the flowers pop right off the page. You are offered a lot of creativity with this techniques in regards to the coloring. I went a little bolder than Sandy and Amy soft coloring. Both methods make a nice card.

I liked the effect so much I made two cards in different colors.


I really like the blue flowers against the Crumb Cake background. Now for the inside photo.


I chose Primrose Petals and a Gumball Green combination for the second card.


A look at the inside.


Stampin' Up products used

Ink- Whisper White (Craft) Primrose Petals, Midnight Muse, Marina Mist and VersaMark.
Card Stock- Primrose Petals, Midnight Muse Naturals Ivory and Crumb Cake.
Designer Series Paper (DSP) Print Poetry  Paper Pack.
Embellishments- White Embossing Powder, Classic Pearls, Linen Thread, Antique Brad and Itty Bitty Shapes Punch.
Stamp Set- Secret Garden and Wacky Wishes.

I hope you have an opportunity for inspiration today and get to create something fun.

Chat soon,
Patrice